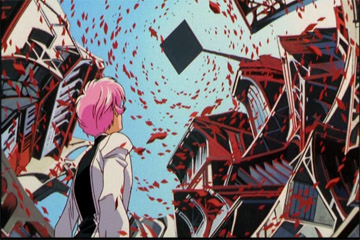
Dealing with Anamorphic SourcesSome video sources are lucky enough to be encoded as Anamorphic Widescreen. This is a good thing in terms of quality. So, what is anamorphic? Let me demonstrate... The standard resolution of an NTSC DVD is 720x480 - this is a 4:3 aspect ratio (well, it is for TVs as TVs don't have square pixels). However, in order to maximise the amount of pixels being used, a widescreen movie is sometimes scaled to fit that resolution like this (images are 1/2 size):
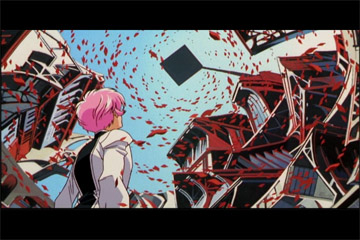
This means that the video is using all of the available quality of the DVD and it also means that widescreen TVs only have to stretch the image horizontally - which is also good for quality. The real aspect ratio for the image is actually 16:9 so the image, when shown corrected, will look like this:
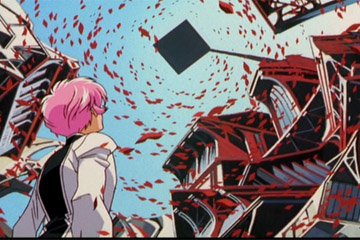
That image was made by stretching the image horizontally, just like a widescreen TV would do. If you were watching it on a 4:3 display, you might be able to set it so it adds bars to display the 16:9 image like this:
Crap isn't it? :) It looks much less impressive - I can't believe that for years and years we watched movies this way on TV *shudder* :P
Dealing with Anamorphic Footage If you have the Utena movie or another anamorphic source such as Akira, Princess Mononoke, Metropolis and so on, then you will have to decide what to do with the fact that it's all stretched out of proportion. There are three things you can do: 1) Make it Pan and Scan like the last image - I don't recommend this most of the time, for obvious reasons, but if you are doing a video using various sources and only a small amount of the footage will be widescreen then you might as well make it all look the same. This method is also kind on interlaced sources as to make it Pan and Scan you resize horizontally and crop the edges, which keeps the scanlines intact. 2) Edit it the way it is and deal with the ratio when you're done - this isn't such a bad idea and is the best way of keeping widescreen footage if you are editing thing interlaced. However, at some point you are going to want to correct the aspect ratio unless you are authoring a DVD. So you might as well change the aspect ratio now... 3) Resize it to its widescreen ratio before editing - this is a good way of dealing with it because it means that you are editing it in the correct aspect ratio, so all your credits and other elements will be the way they will look at the end. I made the mistake of editing an anamorphic source and doing 720x480 credits which became squashed when I corrected the aspect ratio at the end. Ooops. The only possible downside is that you really need to make your source footage progressive to get full advantage with this. I personally don't see this as a disadvantage. Now, I'm actually going to show you how to deal with all 3 possibilities, as all are viable options although I don't like option 1 personally. Options 1 and 3 use avisynth, which you will probably be using if you have DVD footage anyway. If your footage is captured then you will have to make an avisynth script that imports this footage, read the basic avisynth guide on how to use this program. Making it Pan and Scan: If you want to make your anamorphic source pan and scan, add the following lines to your Avisynth script before doing anything with it. Once you have a .avs file that imports your footage (be it from a dvd2avi project file or form a capture) add the following lines:
This will correct the aspect ratio and then clip the edges leaving you with footage that looks like normal 4:3 dvd footage at 720x480. Editing it the way it is: Obviously, you don't need to change the source footage any but make sure that if you add any credits or make any custom bumpers then make them at the resolution 960x480 and then resize them to 720x480. This will make them all stretched-looking just like the anamorphic footage and will come out looking right when you fix the aspect ratio after editing. Resizing it to its widescreen ratio before editing: There's a number of things you can do here. You could stretch it horizontally just like a widescreen tv by adding
to the end of your Avisynth script before doing anything else with it (like creating clips or editing). If you do this, then you will have to edit in 960x480 - this does have the advantage of keeping a little more quality before the final resize, so it offers a benefit to your final internet encodes. However, you will have to resize again for any MPEG2 submissions to conventions so this is a minor downside. The other way is to scale it downwards using
...That will correct your aspect ratio and keep the horizontal resolution the same as standard DVD footage. You can choose either. I personally resize down to 720x360 because it means that I can add borders to that and have my final encode ready for compressing to MPEG2 and sending to a convention. Whatever you choose, there's something else I recommend.... If your source is anamorphic widescreen then it's 100% likely to have been originally FILM and so you should InVerseTeleCine. If you resize down you HAVE to IVTC and if you don't resize down then you'll have to IVTC at some point anyway so you might as well do it now :) You may be lucky enough to be using a truly progressive source (like Princess Mononoke) where you can use Force Film in dvd2avi which will remove interlacing so you wont have to worry about it (see ripping guide). That is rarely the case though (unfortunately) so you should Inverse Telecine as described in this guide if your source isn't really progressive. OK, so this method will give you a script that looked something like this:
This corrects the aspect ratio and removes interlacing. You can edit at these resolutions without much of a problem. Note: if you are doing an amv that is a mix of normal letterbox widescreen and anamorphic sources then you should resize to (720,360) and add this line at the end of the script.
This will add black bars (letterboxing) to the top and bottom like in the 3rd picture above and will make the footage 720x480 just like normal dvd footage. You can also do this after editing a full amv in 720x360, which is essential if you are submitting to a convention in MPEG2 format and another good reason for resizing to 720x360. I hope that made some kind of sense and you can now work with your anamorphic footage.
|