AnimeMusicVideos.org > Guide Index
AviSynth and AvsPmod - What they are, and why you need to use them!AviSynth is, in my humble opinion, the most significant addidition to Windows digital video editing in recent memory. It is incredibly powerful and, once you get used to it, it is incredibly convenient for doing all kinds of wonderful video manipulation tasks that would be very difficult to do otherwise. However, many people don't really know what AviSynth is, what it does or why any of this is actually useful. Others feel that they don't need it because their method has worked for them and they are sticking to it... but I say if you give this program a chance you will soon wonder how you used to live without it. Demystifying AviSynthAviSynth isn't a program in the way you may usually think of programs. You don't run an .exe and use some graphical interface to change settings or anything - that's not the way AviSynth works. AviSynth is a video processing machine that works in the background. It's a trickster that makes video editing/playback software think that it is reading a video file when in reality the footage is being generated frame by frame to your design thanks to Avisynth.All you do is write a simple text file with some commands on it and you give this file to a Video Editing program to read. When the Video Program looks at the file it doesn't see the commands you wrote, it sees video. The video the program sees is what you described in your simple file. Let me demonstrate the process by using resizing as an example: So, instead of having to make a brand new video which is bigger than the old one, AviSynth simply makes each frame bigger when the editing program wants to see that frame. This all happens behind the scenes so that the effect is that you have your bigger video but no need to re-encode or make a new file. Of course this sort of thing you can do in your editing program - you can tell the editing program to scale up the footage. This is just the start though - you can put all sorts of commands in these scripts such as: And all of this can be done before the video program even sees the footage - and all in one place. You don't need one program to decode the dvd footage, then another to remove interlacing and then another to make it look better. AviSynth does all these things and a LOT more all in a simple script file that you write. AviSynth has become essential to Windows digital video editing because of this flexibility and also because of its immense power. The kind of deinterlacing and telecine removal that you can do in avisynth is something that you could potentially pay thousands to do as part of your professional video editing program. The ability to decode mpeg2 is something that many editing programs have these days but few can do it quite so accurately as AviSynth. Combine this with its ability to convert types of footage, and do all the other digital manipulations it does, then it's easy to understand why this is such as useful tool. And all of this is done in a mere few lines of text. That's the real beauty - you need to change something, you change the script. You want to add something else, you add it to the script. It's convenience in excess... you just need to work out how to use it. AvsPmodAvisynth uses scripts which you have to write and it is these scripts which tell avisynth what to do and what video to produce when this script is given to a video editing program. Now although these scripts are pretty simple things it is very different from what most people do - it's more like programming than video editing - but you'll pick it up pretty quick. Now an AVS script is simply just a plain text file that you could write in Notepad if you wanted to. However we have a much better tool at our disposal than notepad - AvsPmod.AvsPmod is like a souped-up text editor specifically designed for making AviSynth scripts. It has a ton of great features like syntax highlighting, autocomplete, integrated video preview, a tabbed interface for easily comparing different scripts, and so many other features that I really can't even get into them all here. Even if you don't understand what all of that means, just rest assured, it makes creating AviSynth scripts VERY easy and fast. But enough talk, let's jump right into it. When you first open up AvsPmod, you should see a window like this: 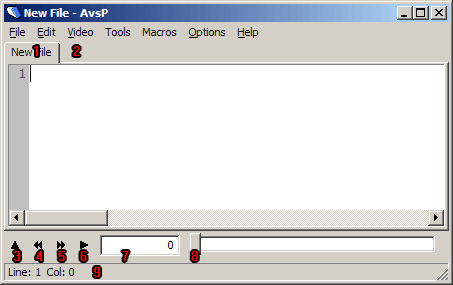 1) This is the currently selected tab, which shows you the AviSynth script you are currently working on. AvsPmod lets you open up multiple scripts at the same time in different tabs. If you want to duplicate a tab, simply double-click it. 2)If you double click in the empty area beside your tabs, it will create a new, empty tab. 3)This button opens up the video preview window beneath your script. You can also open or refresh the video preview by pressing F5 on your keyboard. 4)Pressing this skips backwards one frame in the video preview. 5)Skip forward one frame. 6)Pressing this button will open up your script in an external video player. The first time you press this button, AvsPmod will ask you for the location of the video player. While players like Windows Media Player or Media Player Classic should work fine for the most part, I would actually recommend setting this up to use VirtualDub, since it gives you a really quick way of bringing your script into VirtualDub for encoding. 7) Displays the current frame number. The first frame is numbered 0, not 1. 8) Trackbar that you can drag to seek through your video. 9) Status bar that tells you all sorts of useful information about your video, like the current frame number and current time in the video, resolution, framerate, colorspace, and even the coordinates and color of any pixel in the video that you move your mouse over. A simple scriptIn the text area, type the following line:ColorBars()AvsPmod should turn the text dark blue like this, because it recognizes the phrase "ColorBars" as an internal AviSynth command. If you misspell it, it will stay black. Now, press F5 to bring up the video preview. You should now see a colorbars test pattern being displayed. Congratulations, you've made your first AviSynth script! Now if you press the button to open up the clip in an external player (assuming you set one up as described above), then when you play this file in your player, you will also hear an annoying beep along with it. This is the audio test pattern that is also generated by the ColorBars command. AvsPmod can't play audio, so you will always have to open your scripts in an external player in order to hear it. Now, let's test out the Auto-completion feature in AvsP. Delete the ColorBars line, and then just Type: CoAs you type, you should see a menu come up, like this:  This menu contains a list of AviSynth commands that AvsPmod knows about. "ColorBars" should probably be the command that is highlighted in this menu, but if not, you can simply use your Up and Down arrow keys to find it. Once it's selected, you can press Tab to automatically insert the command into your script. One thing you need to remember is that the autocomplete menu will only come up if you capitalize the first letter of the command. Now having pressed tab to automatically insert the command, you will see that it has an opening parenthesis at the end of the command, but not a closing parenthesis. You should also see a small box appear under the command that looks like this:  This box is called a calltip and it shows you all of the parameters to the ColorBars command that you can adjust. Also, if you click directly on the calltip, it will open up the documentation for that command if it is available. Now we can see that ColorBars can take 3 different parameters: width, height, and pixel_type. Let's try changing these parameters by typing the following line: ColorBars(320,240,"YV12")Press F5 to check the result. Now for a bit of explanation about what we just did. The calltip told us that width and height were both integers (int), so that means we can just type in a number for those. If it had said they were "float" values, then that means we can use a floating point (decimal) value such as 320.587. If you try to use a value like that here though, it would just cause it to display an error. The final parameter was "pixel_type" which is just another way of saying Color Space. We could have used RGB32, YUY2, or YV12 here. Now you may have noticed that it lists pixel_type as being a "string". A string, in programming terms, just means a series of characters. Strings are always enclosed inside of quotation marks, while ints or floats should never be in quotes. Now we could have written that exact same line like this: ColorBars(width=320,height=240,pixel_type="YV12")This will do exactly the same thing as the previous line, but this time we have explicitly told it which values go with which parameter. The only reason previous line even worked was because we put the parameters in the correct order. What if just wanted to specify the pixel_type, but leave the height and width at their default values? ColorBars(pixel_type="YV12")Works just fine, but ColorBars("YV12")Displays an error! So the important thing to remember here is that if you are specifying the parameters in the order that they appear in the calltip, then its ok to leave out the name of the parameter, but otherwise you need to specify their names. Now speaking of default values, here is another handy tip: When using the autocomplete, instead of pressing Tab, you press Enter instead. You will see the following: ColorBars(width=?,height=?,pixel_type=?)By using Enter instead of Tab, the autocomplete feature will automatically write all of the parameters, along with their default values, if AvsPmod knows them. Unfortunately, AvsPmod didn't know the default values for the ColorBars command, so it just filled them with question marks, so this isn't the best example. We will look at this in further detail a little later though If you were curious though, the default values used by ColorBars are width=640,height=480, and pixel_type="RGB32". A more complex scriptNow, why don't we try loading an actual video into AvsPmod? First, make sure to erase any commands that you have already written, so you are starting from an empty script. You can now select a video to open by either going to the File menu and then selecting "Open", or by pressing Ctrl+O, or by middle-clicking somewhere in your script.Just so we are all on the same page here, I would recommend that you grab one of my favorite AMVs, Believe by Kevin Caldwell, and try loading it. AvsPmod should generate a line that says DirectShowSource() and contains the path to the file. Pressing F5, you should be able to see the video. And on that note, this would be a great time to explain about some of the various source filters that you can use. AVISource() - This command will open an AVI file through using Video For Windows (VFW). This requires that you have installed whatever VFW video codec that your video uses. When loading uncompressed AVI files, or AVI files compressed with a lossless intra-frame codec, such as HuffYUV or Lagarith or UTvideo, then this is the command to use. DON'T use this with other types of AVI files, such as those encoded with Xvid.There are other source commands, but these are the primary ones that you will be using. Now, you hopefully have your video loaded, so let's do some stuff to it! Each command in Avisynth needs to be on a seperate line, so keep that in mind. Now maybe I hate the song used in this video, and so I want to just get rid of that audio altogether. I can do this quite simply with the line KillAudio(). I see some black bars on the sides too, so why don't I crop those off? I can do that with Crop(16,0,-16,-0) [the crop command crops off the number of pixels you specify from the left, top, right, and bottom; the right and bottom need to use negative values]. Now, there might be a little bit of black space left around the video in some parts, but for the purposes of this example, I'm not going to be too picky. Next, this video is pretty darned small. I can barely see it on my huge monitor. I think I'll resize it up to 640x480 by using the line Spline36Resize(640,480). Now there are a lot of different filters that can be used to resize, such as BilinearResize(), BicubicResize(), LanczosResize(), and a ton of others. I think Spline36Resize gives a good result, so it's what I normally use. Now at this point, your script should look something like this: DirectShowSource("C:\Believe.mpg")Now admittedly, this isn't a very useful script, but it hopefully helped you understand the basics of how AviSynth works. Now let's take a look at one of the really cool features in AvsPmod. Let's add yet another line to this script, and start typing Tweak. When you see it come up in the autocomplete menu, press Enter to have AvsPmod automatically fill in all of the default values. While that didn't work back when we tried it with ColorBars, it should work just nicely with this filter. Now if you have the video preview up, you may have noticed that as you add each command, you see it appear again over to the right side of your video preview, but with a "+" mark in front of it. If you try clicking on the "Tweak", command over here, it will expand to reveal something interesting. 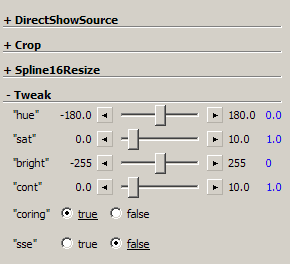 As you can see here, AvsPmod has automatically generated a user interface to adjust the properties of this filter! The tweak command lets you adjust things such as the hue, saturation, brightness, and contrast in your video. Traditionally, filters like this have been quite difficult to use, since you basically have to just guess at the values you want, and keep adjusting it until you get something that you like. With these sliders given to us by AvsP though, we can adjust these settings very easily! Careful though, as some of the settings are very sensitive. If you want to restore any particular setting to its default value, just click on the blue value on the right side. Now this is probably enough scripting for now, so if you are satisfied with what you've done, you can save your AviSynth script by going to the File menu and choosing Save or Save As. You probably aren't very impressed with AviSynth at this point, but just wait until we start doing some seriously cool and useful stuff with it later on... Avisynth PluginsAvisynth plugins contain functions that people have written as additions to the core AviSynth tools. These plugins are essential to getting the most out of AviSynth as they give it abilities it would never usually have.You will have a folder called "Avisynth 2.5\plugins\" and this is the default plugin folder. When plugins are put into this folder they are automatically loaded into avisynth so you can use the functions straight away in scripts. If you do not have a default plugin folder registered or if you have a plugin that is not in this folder, you have to load them manually. This should be done at the very start of a script before any commands, e.g.: LoadPlugin("C:\mpeg2dec\mpeg2dec3.dll")Thankfully for you, you will not need to do this if you have the AMVapp installed. The AMVapp has a large variety of plugins and custom script functions, all of which do not need to be loaded manually. You will see exactly how to use these plugins in the guides that are to follow. AviSynth IncludesThe final info you will need to know about Avisynth before we get onto other programs is that there are some functions which are not plugins but are loaded into avisynth when it starts. These are scripts that are contained in the plugins folder and have the extension ".avsi"There are a number of these and they all contain interesting functions which will be described in greater detail as they are required. You can also define your own functions in these files - just follow the instructions in the AviSynth documenation on creating custom functions. These .avsi commands are automatically "included" when you make a new avs file so some of these avsi files are used for global settings. SetMemoryMax.avsi, for example, dictates how much memory each AviSynth script is allowed to use - this is to avoid crashes in editing programs when using many scripts. That should be all you need to know about using AviSynth for now. The following information on this page is not completely necessary, so you can skip over it for now if you feel like this is becoming a bit too much. Advanced ScriptingNow this isn't actually advanced stuff per se, it's actually quite basic. I think the following information can be quite helpful in making AviSynth scripts, but you can probably get by without it if you want to go ahead and skip to the next part of the guide.Multiple commands per lineYou can actually put more than one AviSynth command on a single line if you combine them with a period, like so: Crop(16,0,-16,-0).Spline36Resize(640,480)Splitting linesYou can also do the opposite of this, which is splitting a single command across multiple lines. You can do this with a forward slash, like this:Crop(left=16, \ top=0, \ right=-16, \ bottom=-0) CommentsYou can add comments to your scripts by using the # symbol:Crop(16,0,-16,-0) #this crops 16 pixels from the left and the right. VariablesYou can store commands in a variable name. Look at the following example:video1 = AVISource("C:\video1.avi")Now theres a lot going on here, but I'll try to break it down as best I can. The first two lines load two different AVI files. I assign each to the variable names video1 and video2. On line 3, I loaded an audio file, which I assigned to the variable name audio. In line 4, I told AviSynth to take the clip stored as "video1" and resize it. On line 5, I join the two video clips together. finally line 6 joins the audio up with the video, and returns the whole thing as the final clip. This return value in the very last line is quite important. Without a return value, your script wont be able to function and will return an error, because it doesn't know what to output. If you were to write "return video2", then AviSynth would just return the original video2 file. All of the other lines where you joined it and added audio and everything wouldn't even matter, as if they weren't even there. Now you may be wondering why we didn't need to use a return value in any of the other examples above. The simple answer is that we were, or rather, AviSynth was taking care of it for you behind the scenes. It can be illustrated very easily with the following example: AVISource("C:\video1.avi")Internally, this is what AviSynth is actually seeing: last = AVISource("C:\video1.avi")To test this, you could try this final example: AVISource("C:\video1.avi")
|