AnimeMusicVideos.org > Guide Index
Improving Visual Quality with AviSynth Filters
| ||||||||||||||||||||||||||
|
How to use this page:
|
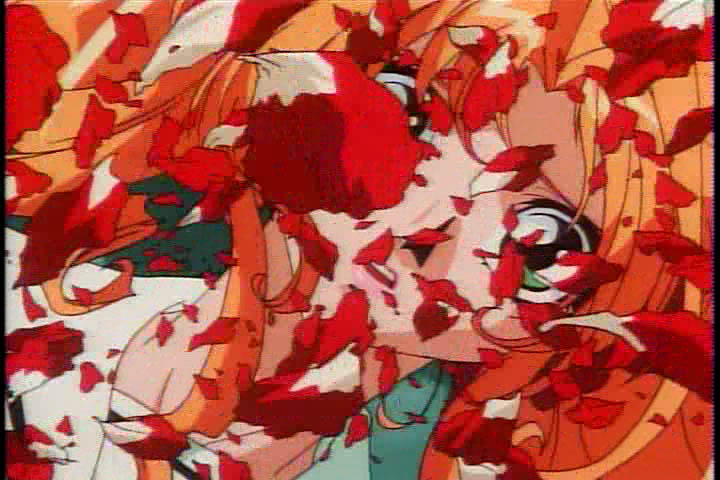
Blocking and Ringing are types of artifacts that are caused by certain types of video compression. Both video from DVD, and just about and sort of video that you download off the internet will suffer from blocking and ringing. If the video is encoded well, then it may be so minor that you don't even notice it. On the other hand, it may be VERY apparent, as seen in the image below.
Blocking is easy to spot. It appears as sharp, blocky edges in your video, which shouldn't be there. It is particularly apparent in the red flowers shown here.
Ringing is a little more difficult to describe. It is also caused by video compression, and tends to be tougher to remove than blocking. Ringing is also referred to as Mosquito Noise. It manifests itself as specs around edges. It can be seen all throughout the image below. Both blocking and ringing tend to become worse on scenes that contain high amounts of motion, and the problems can subside or disappear on scenes with little or no motion.
|
|
|
Blocking Sample |
MPEG2Source Postprocessing: The MPEG2Source command contains a parameter called cpu which allows it to deblock and dering your video. This is the best way to deblock/dering your video! Because it is part of the MPEG2Source command, this must be used when you load your d2v file, before you ever edit your amv. If you have already exported your amv as an AVI file, or if you weren't working from DVD source to begin with, then you will have to use one of the other two methods below. This parameter can be set to values from 0 to 6, with 0 being completely disabled, 4 being full deblocking, and 6 being full deblocking and deringing. You can try other values if you like, but 4 and 6 are by far the most useful. What makes this method so much better than the other methods is that the MPEG2Source filter can determine how much filtering should be applied to a particular frame and adjusts it's strength accordingly. This means that frames that contain heaving blocking and ringing will be filtered much more agressively than frames that have light or no blocking. To use it, simply insert the cpu parameter into the command, like so:
mpeg2source("shamanic_princess.d2v", cpu=4)
I usually recommend using CPU=6 for for all but the nicest looking DVDs, but always at least use CPU=4 even on the best DVDs. Some people think that cpu=6 can cause some loss of detail, so of course the decision is up to you. By clicking the links above, you can see how both cpu=4 and cpu=6 changed this frame.
Deblock: This is a different type of deblocking based on a method used to deblock H.264 video. You simply need to set the parameter quant, which determines the strength of the deblocking, like so:
Deblock(quant=25)
The default quant value is 25, and the maximum value is 51. While this filter can be quite effective, be careful because it does tend to remove detail and cause blurriness at stronger settings. Also unlike MPEG2Source, this command does not dynamically adjust itself for each frame, but instead uses a constant strength across all frames.
Alright, so what do you do if your video has a LOT of noise in it? You want to get rid of it, right? Well, hold on there, because it's not so easy. Well actually, thats a lie. Its actually very easy to get rid of noise. The trick is getting rid of noise WITHOUT also getting rid of real details in your video. No matter what denoising filter you try, this is the problem that will come up each time. The more agressively you try to remove noise, the more you are going to remove real details from your video, the more blurry you will make your video, and the more your video will get that "washed out" look. In some cases, you are probably better off just leaving the noise there than you are trying to get rid of it. In fact, some types of noise are actually put into the video on purpose. Worst case scenario, you will end up with a blurry, oversmoothed video that is STILL full of noise.
That's not to say that efforts put towards removing noise are pointless. In fact, sometimes noise can be removed very effectively. This all works on a case-to-case basis though, and for each source, you will need to experiment to find the best ways of reducing the noise. Now, there are a LOT of AVISynth filters out there that have been designed to reduce noise. I'm just going to give an overview of some of my favorites, which I think should give you pretty good results under most circumstances.
If you would like to see more denoising filters in action, Scintilla has written up a nice comparison of some of them here.
Before we get started, I want to point out that there are two primary ways of removing noise from a video. One is spatial smoothing. This type of smoothing trys to blur the video in areas that contain noise, while retaining detail as best as possible. However this usually doesn't work out too well, and these kinds of filters can lead to your video having an 'oversmoothed' look to it if you use settings that are too strong. However spatial smoothing is rather effective at getting rid of certain types of noise. The other way to remove noise is by temporal smoothing. This type of smoothing looks at the things which change between different frames. Because noise is usually changing on every frame, temporal smoothers can usually remove it pretty effectively without the side effects that spatial smoothers have. However temporal smoothers can cause artifacts of their own, but it's usually not too bad.
|
| |
|
Light Noise |
Heavy Noise |

TTempSmooth: This is one of my favorite filters, and I use it on essentially all of my encodes. It is quite simply just a temporal smoother, but it does a rather good job at it! At the default settings, the effect is barely visible on individual frames, but it does a good job of stabilizing noise across frames and improving compressibility. I normally just use it at it's default settings, but here are a couple of parameters that you might want to adjust:
lthresh/cthresh. These two parameters refer to the luma threshold and the chroma threshold. The defaults are 4 and 5 respectively. Increasing these values will increase the strength of the filtering, but might create artifacts if you set them too high.There is another version of this filter called TTempSmoothF() which is basically a faster version which isn't quite as effective. If you want to do very light temporal filtering, then you might want to give that a shot.
DFTtest: This is both a spatial and temporal smoother which uses a method of smoothing which should be more pleasing to the eye. It is rather slow however. The primary parameter that you will want to touch is sigma, which sets the strength of the spatial smoothing. sigma=16 is the default strength, and where I recommend you start. Higher sigma will remove more noise but makes the video blurry. If you would like to disable the temporal aspect of this filter for some reason, you can also set tbsize=1. Here is an example of using this filter with slightly higher than normal strength:
dfttest(sigma=20)
TemporalDegrain: Alright, now it's time to bring out the big guns. TemporalDegrain is an absolute MONSTER at killing grain, and it does it with very few side effects. This function is *really* slow though, so I don't recommend using it unless you have some major grain in your video and you want that stuff completely gone. I usually don't even bother trying to adjust any of the settings on this one, and just use it with the defaults.
TemporalDegrain()
Now that you have removed some of the noise from your video, do you think it might need a little sharpening? Most anime could benefit a bit from a small amount of sharpening to make the edges more defined. Of course, maybe you think it looks sharp enough already, and that may be so. Don't feel like you have to sharpen your video, just because you can. In a lot of cases however, it can really make your footage stand out, as long as you don't overdo it.
While conventional wisdom tells us that sharpening will make your video less compressible, this is actually only the case with one of the sharpeners that I'm going to show you. With some non-conventional sharpening methods that we will try, there will be very little effect on the compressibility, or it may even make your video MORE compressible!
|
|

FastLineDarkenMod: This filter basically just darkens the lines in anime a bit (and can also thin the lines a little), which can make the image appear slightly sharper, or at least more defined. It's not something that you always need to use, but can make some stuff look better, especially if the lines all look faded. The main option is the strength parameter, which defaults to 48, but can be set anywhere from 0-256. Another setting you might want to look at is the thinning parameter. If you set this to 0, it will disable line thinning and give a big speedup.
LSFmod: LSFmod (which stands for LimitedSharpenFaster Mod) is a great sharpening filter, but unfortunately it will hurt the compressibility of your video a bit. Regardless, you may want to use it, because it can look very good. The main setting is the strength parameter. The default strength value is 100. If you want to increase the strength of the sharpening effect, you would do it like this:
LSFmod(strength=120)
This will do sharpening a bit stronger, but of course at the expense of hurting compressibility.
aWarpSharp2: This is a very peculiar filter, and must be used very carefully. aWarpSharp2 works by warping the image in such a way that it thins lines. I feel like the default settings of this filter are way too strong for almost any purpose, because it simply warps the image way too much. When it warps the image too much, the effect can be very obvious, and it will make your footage just look strange. I personally only recommend this filter for sources that appear visibly blurry to you. Because this filter tends to make lines thinner, it can bring thick, blurry lines back closer to how they ought to look. You can adjust the strength of this filter with the depth setting, which defaults to 16. I think a value of about half that is a good starting point.
aWarpSharp2(depth=8)
Again, be very careful with this filter so you don't overdo it. This filter can make your video look HORRIBLE like this.
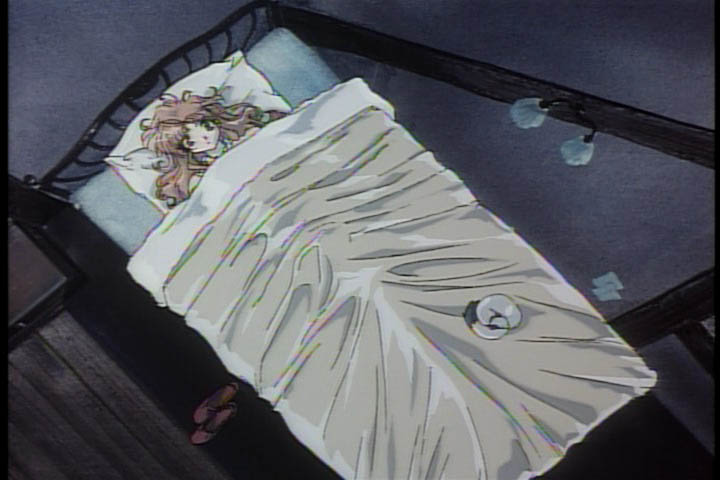
What is rainbowing? Just take a look at the image below, and it should be painfully obvious. Rainbows manifest themselves as shimmering colors along edges. Not only is this really ugly, but the changing colors also hurt compressibility! Fortunately, we can usually remove rainbows quite effectively.
|
| |
There exist a number of different filters and functions designed to combat rainbowing, but many of them are old and outdated or just don't work all that well. I have decided on just two methods of rainbow removal that I believe work very well for pretty much all situations.
DeRainbow: This is a function written a few years ago by Sh0dan which is excellent at removing rainbows. It works by creating a mask of the edges in the video, then smoothing the chroma channel of these edges both spatially and temporally. This works extremely well and with few side effects. You should note however, that it can case some slight discolorations around edges, especially if you use a high threshold. The default threshold for rainbow removal is 10, and you can increase or decrease this value as you deem necessary by calling this function like so:
DeRainbow(10)
BiFrost: This is a filter which operates purely temporally. This means that it shouldn't cause any discolorations around edges like DeRainbow might, and the author of this filter claims that it can actually recover detail. The downside of this filter is that it really only works on parts of the image that are static (not moving). Anime tends to have a lot of non-moving scenes though, so this can be quite effective most of the time. You should use BiFrost like this:
BiFrost(interlaced=false)
Sometimes though, you may not see much, if any difference at all! In those cases, you may need to use BiFrost before you IVTC/Deinterlace the source. Now if you have already edited your video, you obviously cant do this. But if you are preprocessing your footage, this is an option. You would put it directly after the MPEG2Source() line, and call it without the interlaced=false parameter.
Dot crawl is a particularly nasty problem, and usually appears on the same sources which have rainbows problems (and some dot crawl removal filters will also remove rainbows). While dot crawl used to be nearly impossible to handle, these days there are some filters which can do a pretty good job at removing it. Dot crawl typically manifests itself as tiny dots that appear to be crawling around over edges of the image. Dot crawl can also appear as shimmering or flickering around edges. Because it moves, dot crawl is much more visible when you are watching your video in motion than it is in single frames. Here are three filters which can usually do a reasonably good job at dot crawl, but keep in mind that for them to work well, they need to be used before IVTC or deinterlacing. In the following example, the dot crawl should be particularly noticable along the right side of the image.
|
| |
Checkmate: Pretty simple filter that only has one option. The higher the number the stronger the strength. I'm not sure what the default value is, but 24 seems to be a good starting point.
Checkmate(24)
Tcomb: A powerful filter but can be a bit complex to set up. I highly recommend you read the documentation on this one before using it.
Dedot: Although this filter has a few different settings, it's not well documented so I am not sure what they all do. I usually just try it with the default settings and see how it looks.
Aliasing means jagged edges. The process of removing aliasing is called anti-aliasing. There are two primary kinds of aliasing that you will run into, so I will show you how to handle both.
|
| |
Aliasing from combing/deinterlacing
| |

The first type of aliasing is very common on High Definition sources that have been upscaled. This kind of aliasing is usually rather subdued, and you may have difficulty noticing it. We can handle it with a really slow filter, naa(), or a faster but less good filter called maa().
The other primary cause of aliasing is from combed or badly deinterlaced footage. This aliasing is usually VERY apparent, and its much too strong for the previous filters to help. For this kind of aliasing, you will want to use a filter called daa(). If aliasing still remains, you might want to try adding it a 2nd, or even 3rd time. Of course, this will introduce blurring though.
None of these filters take any settings, so if one doesnt work, you might want to try another. Just keep in mind that naa() and maa() are more for very small, minor aliasing, and daa() works better for major aliasing.
Color banding is a curious issue. It's typically much more visible on LCD monitors than CRTs, but LCDs seem to be the mainstream these days. Also, it may only become a big problem AFTER you make your final encode. So, we are going to need to look at eliminating banding that already exists in the source, and also at preventing banding from occuring when we encode. Thankfully, we can do both with just one filter. Please note that I have chosen a particularly strong example below. You typically wont see banding this bad.
|
| |
|
Original | |

The filter that we are using to control banding is called gradfun2dbmod. This filter has a number of parameters that you can adjust, and I'll explain the most important ones here. First, I'll explain how the filter operates. The filter first creates a strength mask on the frame, looking for areas that it thinks need stronger filtering than others. Then it dithers these areas, and finally adds some grain. The dithering helps to remove the banding that already exists in the source, and the grain helps to prevent new banding from occuring when you encode. However, grain will make your video more difficult to encode, resulting in a larger filesize, so we want to avoid adding grain when possible.
The thr parameter controls the strength of the dithering. If you want to eliminate banding thats already in the source, this is the value you want to play with. The default is around 1, and you generally don't want to go higher than about a 2, unless you really have to.
Next we have the str parameter, which controls the amount of noise that will be added. The default here is 0.8. You can completely turn this off simply by setting it to 0.
There is another setting related to the grain, called temp. This controls how "noisy" the grain is. A value of 100 will be very stable, while a value of 0 means the noise is jumping all over the place. The default is 50. Setting this value higher, maybe even all the way to 100 can help minimize the negative impact on compression efficiency.
Finally you might want to change the mask parameter. This setting is either true or false. If you set this to false, then it will use the same strength over the entire frame (and you should see a speedup as well). If increasing the thr parameter doesn't seem to be helping much, try setting this to false.
Most footage wont need to have it's colors adjusted, because it probably already looks fine. In some cases though, especially with older anime, we can really make it look a lot nicer by adjusting the colors a little bit. With the old version of this guide, people were blindly just copying and pasting color adjustment settings for some reason, often making their footage look horrible. If you don't know how to properly adjust the colors (if they even need to be adjusted, which they usually don't), then you shouldn't even mess with them.
Anothing important thing that you need to note--and this applies to all filters, not just color adjustment filters--you must make sure your settings work on the entire video, not just one or two frames that you happened to look at.
|
| |

)
)
)
)
)
)
)
)
)
)
)
)
)
)
)
)
)
)
)
)
)
)
)
)
)
)
)
)
)
)
)
)
)
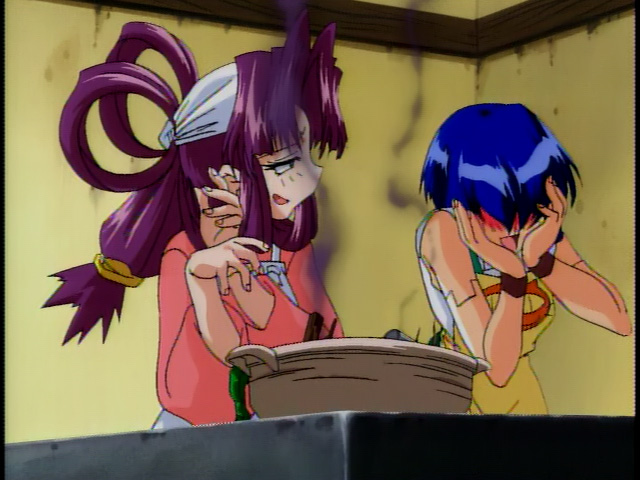
Ok, so as you can see from the images, this original source was rather dull, and it had a very strong pink/red tint. Panda should not be pink! To tweak the colors, I started with ColorYUV(). As you should know, in a YUV colorspace, the color of an image is stored in the U and V channels, so by manipulating these two channels, we can change the overall color tint of the image.
The two main parameters of ColorYUV that you need to be aware of are gain_u and gain_v. By setting gain_u to a positive value, it will make your video more blue, and at negative values it makes your video more yellow. Positive values for gain_v, on the other hand, will make the video more red, and negative values more green.
For the particular source pictures above, I played around with these values until I arrived at what looked most correct. I ended up using a gain_v value of -25 in order to remove the strong red tint, then I used a gain_u value of 5 to give it just a slight bit more blue. The settings I arrived at were ColorYUV(gain_u=5, gain_v=-25).
After getting the color tint correct, I thought that the colors looked a little faded, so I needed to increase the saturation a good bit. For increasing saturation, you can use the Tweak() command. By inserting the "sat" parameter into it, we can adjust the saturation. 1.0 is the standard saturation, 2.0 means twice as saturated, 0 means completely desaturated. For this source, I used Tweak(sat=1.2). Most anime should have perfectly fine saturation, although some older titles tend to be faded and can benefit from a slight increse. Tweak also has some other parameters for things like brightness and contrast, but I strongly recommend against using these. Instead, you should use levels.
Finally, I thought the video was a bit dark, so it needed to be brightened up a little. For this, I used the Levels() command. There are probably hundreds of tutorials on the internet about using Levels, so I'm not even going to try and attempt to explain it here. If you don't know how levels works, just google for "levels tutorial" or "photoshop levels tutorial". I doubt that most sources would need any adjustments to the levels, but in order to use this filter it is suggested to use the Levels virtualdub filter in order to obtain the correct values to insert into the filter. More information on the avisynth levels filter can be found in the documentation.
Other:
There are literally hundreds of different AviSynth plugins and functions available, each designed for doing different things. Unfortunately it is simply not possible to cover everything in a guide like this. I have tried to cover most of the major things that you will encounter though. If you notice other problems in your footage and aren't sure what to do about it, you can always try asking on the forums for suggestions.
If you would like to keep up to date on the latest AviSynth functions, check out this blog: http://blog.niiyan.net/
Alright, so now we are done with cleaning up the video in AviSynth! That wasn't so hard, was it? Next, we just need to crop and resize!