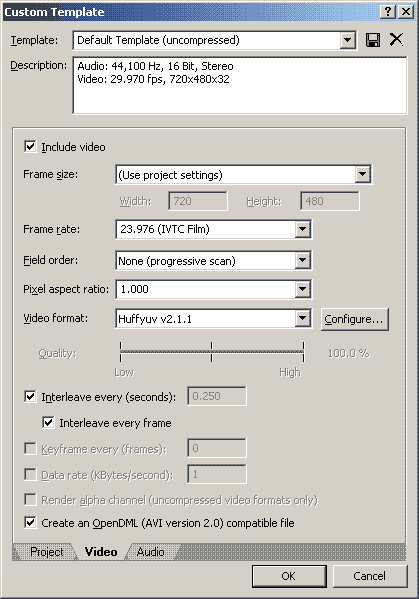
Obviously you will want to
Include video.
Frame size: This should be the same as your
source, which should be the same as your project - so choose (Use
project settings)
Field Order: this, again should be EXACTLY the same as
your source which you should have worked out when you started the
project. Progressive (non-interlaced) footage should be set to "None
(progressive scan)" and interlaced footage should have the same field
order as your
source footage. This is a very important setting.
Pixel Aspect Ratio: If like me you are exporting to
lossless avi then choose 1.000
Video Format: This is the important part. There
are only 2 things you could ever want to choose here - HuffYUV (included
in the AMVapp)
or Uncompressed (unless you are using the native options of a
hardware card).
Occasionally I get errors with my HuffYUV files which result in what I
call 'dirty frames'. This could be just my system but whenever this
happens I resort to using uncompressed RGB. It's big as hell but it
works.
HuffYUV actually has 2 modes of compression - YUV and RGB.
You
should always export RGB as it is the native editing
colourspace of the program - this ensures that everything will look as
it is supposed to.
To make sure that HuffYUV compresses the footage in RGB mode,
and to set up other options, choose
'Configure' next to the
compressor.

In RGB compression method you should always have Predict
Gradient (best) selected. This will make sure that when Vegas
sends the codec RGB footage that it is compressed as RGB and not as
YUY2.
The other options in the Huffyuv settings are not actually
important when exporting from Vegas.
Enable RGBA compression
is useful if you have used Alpha Channels but this is mostly a feature
you would need more for Adobe After Effects. Enabling this option in
Vegas would just give you needlessly bigger files.
When that is all set up, click OK and return to the Video menu.
Choose
'Interleave every frame' - it doesn't matter as we will
export the audio separately but just in case you are not, this option
will weave the audio to each frame.
The rest of these options are fine. Go to the
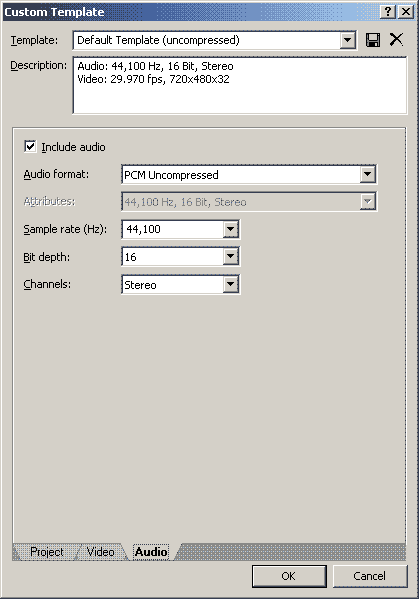
audio menu:
Now, as we are going to export the audio separately you don't really
need to
Include audio... but there's no harm done if you do. If
you do, you will probably want the settings above unless you have used
something other than a CD for your audio in which case you should
export with the same properties as your source audio. Whatever you do -
always export uncompressed.
You should now be good to go. Click ok, check your filename is correct
and render that video.
Be warned, these files are big. If you are using
Windows 2000 or XP make sure that you export to a hard drive that uses
the NTFS file system otherwise long amvs might exceed the 2 gig file
limit on old FAT32 drives. If you are running windows 98 then you are
going to be limited to 2 gig - if you can't export the whole movie for
this reason then you will have to select a frame range and export it in
two or more sections. You can join these later in AVIsynth as follows:
AVIsource("C:/part1.avi") + AVIsource("C:/part2.avi") +
AVIsource("C:/part3.avi")
Hopefully this wont be necessary and you can export the whole thing.
Make sure you have enough space on your drive - you'll need around 2 to
4 gig for a video.
Once you've exported your video, you can export your audio stream
separately for easy access.
Exporting the Audio as a Wav file.
Again, go to
File > Render As... but this time, instead of
choosing Video for Windows (.avi) you will want to choose the option
below which is called
Wave (Microsoft) (*.wav)
Now click
custom... and you will get something that
looks like this:

Format: PCM (Uncompressed)
Rate: This is probably going to be 44100
Hz as that
is the sample rate of CDs. If you used DVD audio as a source you may
have to set this to 48000 Hz. Check your source before setting this
option as conversion is not a good idea.
Bit depth: 16bit
Channels: Stereo
All pretty simple stuff. Click OK and save
your wav file.
Now you have a master archive of your video as
avi file wav file. You should backup these somewhere.
These files are now ready for clean-up and
compression into a distribution format.