Method 2: Editing DVD footage directly.You have avs files which decode and filter DVD footage all ready for editing... but there's a problem. Many video editing applications do not like .avs files by default. Some programs require plugins and other programs have to use what is known as an 'avi wrapper' to make the programs read the avs files. Which method will depend greatly on your editing program. a) Adobe Premiere - Premiere can use .avs files directly thanks to an import plugin which is included in the AMVapp.Choose your method: Adobe PremiereTo edit with your avisynth files in Premiere, you will need to
download the latest Premiere Import Plugin. If you have downloaded and
installed the AMVapp
then you should already have it installed. If you have to install it manually then copy it to your Premiere 'Plug-Ins' folder. (Note: some versions of Premiere Pro require you to copy the plugin to a subfolder within the 'Plug-ins' folder, depending on the language Premiere is set to use. For the english version, you would copy the plugin to 'Plug-ins\en_US') One you have this installed, it will allow you to open
AVISynth (.avs) files in Premiere. Speed Using avs files can be slow or fast depending on how much
processing has to be done by Avisynth. With DVD footage, seeking and
rendering will be slower than with a huffyuv avi file. What I recommend is that you get yourself a fast codec (like
the PICVideo MJPEG Codec or the mjpeg
codec in ffdshow) and select
this as the codec in your "Project Settings". This will be the codec
used for previews. You can always use a different codec later for
exporting but this one is great for fast renders -
especially when set to a low quality level. So, if you need to see if
something has timed correctly, mjpeg codecs are great for that as they
are very quick to decompress when set at low quality. My approach is
usually to place a clip on the timeline, adjust it to fit then press
Enter to render it, so I can see if it synchs. Note also that this method of using footage can be slower if you use deinterlacing/IVTC techniques in your avisynth script to remove interlacing. If you find that it's too difficult editing with
footage this slowly, then please use either method
1 or method
3. A word of warning to Premiere Pro users: Premiere Pro tries to preview your video in realtime rather than rendering it. When editing fom AVS files, it is very unlikely that this can be previewed in realtime! One way people have found around this limitation is to add an extra video track on top of everything else, and insert a long piece of footage on this track that will cover your entire video (a solid color image will work just fine). Now, set that track to use 0% opacity. This will make the track invisible, but forces premiere pro to render instread of trying to play in realtime. Quality, Stability and the Premiere AVS GUI The new Premiere plugin, developed by fellow amv-ers, contains
a GUI which can change the quality of the footage you import into
Premiere and it can also set up memory options to make AVS useage more
stable. When Premiere asks for a frame which is a different size than
your source (preview window, timeline or exporting at a different size)
the avs import plugin has to resize it. To do this there are 4
different resizers that you can choose in the GUI:
As you can tell by the descriptions,
low-quality resizers are fast and high quality resizers are slow. So
what I recommend is setting the algorithm to Nearest Neighbour as this
will ensure the timeline thumbnails and monitor previews will be the
fastest they can be. When you export, however, you will want to change
this to one of the other settings as Nearest Neighbour is poor quality.
The slowdown with the better resizers isn't that much though. With a quick 1000 frame rendering test it took 31 seconds with Nearest Neighbour, 34 seconds with bilinear, 36 seconds with Bicubic and 37 seconds with lanczos3. So, if you don't mind that amount of increase then you can keep it high quality all the time. The right hand section of the GUI changes the Set Memory Max preferences in avisynth. Avisynth is not usually designed to process multiple avs scripts at once and as a result the memory can get used up really fast when processing multiple scripts. This can lead to avisynth crashing halfway through a render. To avoid this you can set the maximum memory allowed by each script. This option currently only works with Avisynth 2.5+ (which comes with the amvapp). The default setting is 64mb but if you are using lots of scripts you may want to reduce this to avoid memory crashes. It's a tricky thing to set, however, as some scripts which have a lot of processing may need a lot of memory and could crash if you set it too low - don't go below 16mb unless you really have to. Errors, bugs, limitations and other things to avoid Using avisynth scripts in Premiere can be a delicate matter.
There are a number of things you should be aware of when importing
avs scripts into Premiere:
If you keep these things in mind you will discover that using
avs footage is a mostly painless procedure. If you have any
difficulties you should see the testing phase earlier in the guide for
details of possible avisynth problems. If you have any concerns or
questions, ask in the Video Software forum. Now that you've read the info and understand the issues it's
time to see how to correctly set up
your video project. Frameserving Avisynth to Programs without .avs SupportThis method uses what is known as an avi wrapper. Many programs, when you give them a file, expect it to have a header that they recognise just like an avi header or an mpeg header. AVS files, however, are just text files so they do not have the information many programs need. There is a way around this using a program called VFAPI, as contained in the AMVapp. Some of you may remember that in older versions of this guide, you were told to avoid using VFAPI because of a number of problems that it had. All of those problems have now been fixed. Before you start, you want to make sure all of your avisynth scripts are in RGB32 colorspace, because this is the colorspace that your editing program will probably be expecting. This should be the final line of your avisynth script:
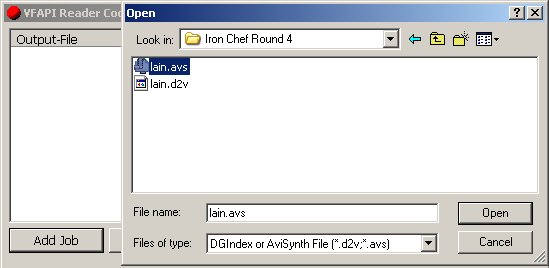
Now, you need to open VFAPIConv.exe. Click the button labeled "Add Job", and in the window that comes up you click on the "Files of type" drop down box and select "DGIndex or AviSynth file". Next, select the AVS file that you want to convert into an avi. A new window will pop up, with a couple options. Just hit ok, and it will add the job to the list. Repeat this process until you have added all of the AVS files though you need, and then hit the "Convert" button.
This avi file doesn't contain any real content it just makes the program thinks it does as all the frames are generated by avisynth on-the-fly. This avi file can be used in any program that reads avi files. However, you cannot delete your avs file, nor should you change any of the settings in it without making a new .avi file. This method for using Avisynth scripts should work as well as the Premiere method but it has not been tested as thoroughly, so proceed with caution. Like with Premiere there are certain things you need to be careful about when dealing with avisynth footage. It is possible that the VFAPI method may have a larger memory overhead than the Premiere import method, so make sure you keep an eye on memory useage when doing exports to avoid crashes and don't use too many avisynth scripts unless you really have to. Now you have your fake avi files ready, you can set up your video project. |
