Downloaded Footage GuideIt's been said over and over, but I can not stress it enough. PLEASE do not use this method to simply download fansubs and use them in place of buying the DVDs. Not only will fansubs have really crappy looking footage, but when you buy DVDs you support the creators of the anime! I've heard all the arguments that fansubs look just as good as DVDs, but forget it. I'm telling you, if you use fansubbed footage, it WILL look like crap. Even if you think it's acceptable, any person with an eye for quality will tell you otherwise. This method should only be used when footage can only be obtained through downloading. For instance, a company may make a promotional video available online. In that case, using the downloaded video would be your only option. I want to stress, that if you do not heed these words and you DO decide to download fansubs and use them as your footage, do not post on the forums asking how to get something working. Such requests will result in your own humiliation, and you will possibly be banned. You are on your own. Also, before we get started, it will be assumed that you are already able to play the files you are trying to use in Windows Media Player or any other DirectShow based player. If you have a file you can't play, I would recommend you download CCCP. Getting StartedWhen most people want to use some file that they have downloaded off the internet in their AMV, they start by simply trying to import the file directly into their editing program. This is bad. Don't do this. As we discussed earlier, codecs that are designed for distribution use inter-frame compression, which will wreak havok on a video editing application. In order to fix this, we are going to load the files through AviSynth, and then convert them into editable AVI files, which will solve all of our problems. Before we get started though, there is one important thing that needs to be done. Disable the Divx LogoI have seen this time and time again, and it just brings a tear to my eye. Theres almost nothing worse than having the Divx logo in your AMV (except of course, having subtitles in your AMV). What's especially sad is that it's so easy to disable the logo! Now, if you don't ever see a Divx logo on any of your videos, then you probably don't have the Divx codec installed, or you have already turned the logo off. If you do see a Divx logo on your videos though, here is how you disable it:Find the Divx decoder properties under your start menu. It will probably be located under DivX > DivX Codec > Decoder Configuration Utility. At this point, you should already be familiar with AviSynth. Here are the topics that we will cover:
MPEGThis applies to both MPEG1 and MPEG2 files. Basically, you want to handle these almost the exact same way as you would a DVD. There are some differences though. For starters, your footage will probably be progressive, so you wont need to worry about things like the field order, or removing the interlacing. The main thing you will need to worry about is resizing your footage properly and with the correct aspect ratio. Go ahead and skip on to this page on Making DGIndex Project files. AVIFirst of all, we are going to try the following AviSynth script (of course, replacing the filename with your own file!): AVISource("C:\yourfolder\yourfile.avi", audio=false) Now, try to play this AVS file in a media player and see if it works. If you get an error that says "AviSource: Could not decompress frame 0" then this means you do not have the required Video For Windows decoder installed on your system. In that case, you will want to use the following script: DirectShowSource("C:\yourfolder\yourfile.avi", audio=false) This one should work just fine, but it's best to use AVISource whenever possible. You may also notice the audio=false parameter. Since we are making an AMV, you probably don't need to use the audio from your video sources. This command will disable the audio. If for some reason you want to keep the audio, then simply remove that part from the command, so that you have something like this: DirectShowSource("C:\yourfolder\yourfile.avi")
I'm going to avoid going into the details of why anyone would make a 120fps AVI in the first place, and just tell you how to deal with it, in case you happen to have one. There is a program included in the AMVApp called tc-GUI. Start up this program and you will notice three boxes where you need to select files. In the first box, choose your 120fps AVI file. In the second box, choose a new filename to save the corrected file to. In the third box, you can fill in any name you wish to save this file to, as you wont need it anyways. Finally, hit the "run" button, and it will output your new, 29.97 fps AVI file. Now, load this file into avisynth just like I showed above. Keep in mind that your audio will no longer be in sync. If you need to keep the audio in sync, use the method below. Finally, if you want your output to be 23.976fps instead of 29.97fps, simply add the following line to your AVISynth script: AssumeFPS("ntsc_film") If you prefer not to use this program, you can fix the framerate in AviSynth instead. You simply need to make a script like so: AVISource("C:\yourfolder\yourfile.avi") This will give you 23.976fps output, and it may be jerky compared to the method used above, so please only use this method if you have to. WMVFor a WMV file, you simply need the following AVS script: DirectShowSource("C:\yourfolder\yourfile.wmv", audio=false) If you want to keep your audio, things are a bit more complicated. In that case, you would need to use a script like this: DirectShowSource("C:\yourfolder\yourfile.wmv", fps=23.976, convertFPS=true) I'm not going to get into why you need to do this, because its rather complicated, but just trust me. You can specify any fps here that you want. You will probably be using either 23.976 or 29.97. OGMFor an OGM file, things will be pretty simple, unless your video has soft subs. Soft subs will be discussed further down the page if they apply to your file. DirectShowSource("C:\yourfolder\yourfile.ogm", audio=false) That's it. If you need audio, simply remove the audio=false bit. MKV and MP4MKV or MP4 files should be handled the following way: DirectShowSource("C:\yourfolder\blah.mkv", audio=false, fps=23.976) It is important to specify the framerate. It should usually be 23.976fps, but if you will be editing at a different framerate, you can use that instead. If you need to keep the audio in sync, simply add convertfps=true, like so: DirectShowSource("C:\yourfolder\blah.mp4", fps=23.976, convertFPS=true) If your file has soft subs, you will additionally need to see the part on soft subtitles below. Dealing with Soft SubtitlesFirst of all, soft subs are what we call subtitles which can be turned on or off. In contrast, hardsubs refer to subtitles that are encoded right onto the video. Hardsubs can not be turned off, because they are part of the video. Most fansubs use hardsubs. This is yet another reason why you shouldn't use fansubs for your AMV. Soft subs can be problematic because they might show up when we load our video through AviSynth! Now, if you open up your AviSynth script and look through it, and you don't see any subtitles, then you are in great shape! If you see these dreaded soft subs though, we are going to have to turn them off. There are two ways to turn them off, depending on what software you have installed on your computer. When you play your AviSynth file, look in your system tray (the area in the bottom right of your screen) to see if the icons for VSFilter or Haali Media Splitter appear. This is what they will look like:
If you see the icon for Haali Media Splitter: Double click on the icon to bring up the settings. Here, you want to go to the options tab, twirl down the "Compatability" heading, and set "Autoload VSFilter" to "No". This is how it should look:
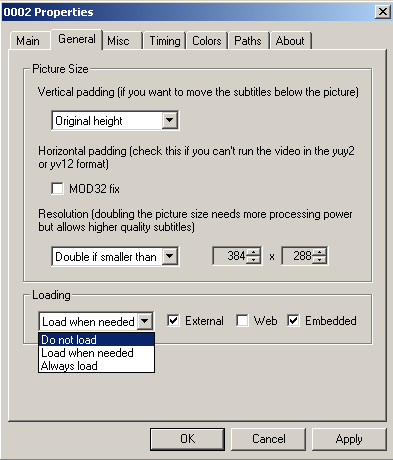
This should disable the subtitles when you are viewing your files through AviSynth, but they will probably still show when you simply want to watch the files. If you see the icon for VSFilter (AKA DirectVobSub), but NOT Haali Media Splitter: Double click on the VSFilter icon to bring up the VSFilter configuration. Go to the "General" tab, and then set "Loading" to "Do not load".
Subtitles will no longer appear on the video. If you want to turn the subtitles back on at some point in the future, you will need to find the VSFilter configuration from some location on your start menu, because the icon will no longer appear in your system tray. Resizing and Changing the FPS of Your FootageSometimes a downloaded file may be encoded at the wrong resolution or aspect ratio, and it will need to be corrected. If you are planning to use multiple video sources in your AMV, you will also need to ensure that they are all the same resolution. Likewise, you will need to make sure all of your sources use the same framerate that you will specify in your editing software. As we showed in the above examples, the AVISource and DirectShowSource commands take a parameter called "fps" where you can specify what you want the framerate to be. The framerate from all of your sources should be the same framerate that you will use in your editing program. You can also add the following line to your AVS scripts: AssumeFPS(X) And replace X with the framerate you want... This effectively does the same thing as specifying the framerate in the AVISource or DirectShowSource command. Finally, you need to make sure your files are all resized properly. This is already explained quite well in the DVD guides, so I will direct you over there: Aspect Ratios - PAR and DAR. Just to simplify though, you will probably just need to resize your footage to either a 4:3 resolution (640x480) or a 16:9 resolution (848x480, 640x352). Downloaded footage likely has a square pixel aspect ratio. If your resizing is all fine, then I highly recommend that you clean up your footage. After that, you are ready to choose one of three methods of editing your footage. These three methods will be explained in detail on the next page, but there is one very important caveat: If you loaded your video through DirectShowSource, you can NOT use methods 2 or 3! DirectShowSource does not support accurate seeking, and if you try this, then your edits will not be frame accurate! You can use methods 2 and 3 only if you have used the AVISource command.
|