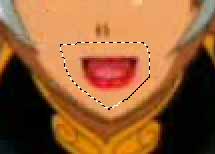
Lip Sync 201If you've made it here, then I assume that you have mastered the techniques covered in the first section. If not, click here to go back. For this section, you will need an image editor. I prefer to use Photoshop 6.0, and that is what this tutorial will focus on. Using Overlays: In the last section, the lip sync technique that I taught you can only be used in scenes where nothing is moving besides the characters mouth. Lets look at a different scenario now. Lets say your character is standing still and speaking, but there is some stuff moving in the background. If you were to use the easy technique, it would cause the stuff in the backgroud to be jumping around all over the place! So this brings us to using what I will refer to as "overlays." First of all, load the video clip that you wish to use into Premiere. Next, move to a frame where your characters mouth is closed. Go to the File menu, then to Export Timeline, then to Frame, to save this frame as a .bmp file. Repeat this process for the frame where your characters mouth is all the way open, and for any different frames in between. Now, start up Photoshop and load one of the .bmp files that you just saved. Select the Lasso tool and use it to draw an outine around your characters mouth area.
Now go to the Edit menu and select Copy. Then go to the Layer menu and select New, then Layer. In the window that pops up, hit Ok. Now go to the Edit menu again, and select paste. What we have done is created a new layer on the image which contains nothing except the mouth. Go to the File menu, and select Save As. Save the file as a Photoshop type, with a .PSD extension. (Other extensions may work, though I have not tested them)  Save the file as a Photoshop type Repeat this process for each one of the frames that you exported from Premiere. Finally, lets go back to Premiere. Import the Photoshop images into your project, and when it asks you to select a layer, select Layer 1 (or whichever layer contains just the mouth by itself). Drag the clips onto video track 2 or greater. They WILL NOT work on tracks 1A or 1B! Next, ajust the length of each image so that each one only lasts for 1 frame. Right-click on each of the images now, and select Video Options, then select Transparency. In the window that pops up, there should be a drop-down box labeled "key type." Select Alpha Channel in this box, then hit Ok. Finally, move around these images to make the mouth move in the way you want it to, similar to how you did it in the first lesson. Remember that in order to preview your work, you need to hold down the "Alt" key while moving through the timeline.  How your timeline may look after you have arranged the frames in order Continue: Lip
Sync 301: Advanced Techniques
|