by Dennis 'Kirin' Ramos
kirin at saphiria dot net
Introductions | Splitting Clips
Import Clips and Using iMovie
Exporting from iMovie
Helpful Tips and Suggestions
Importing clips
Because the DV file format is really huge (a 15MB 2:21 minute DivX clip blows up to 497 MB!) it helps if you plan your video out before you start importing clips ... unless you have a really huge hard drive and don't care about space. If that's the case then you would use up to 5 GB on just one episode! A short 13 episode series would be around 65 GB! (assuming each episode is around 25 minutes a piece.) I would take note of some of the transitions and effects you have available and what scenes you could possibly use to make your video look good before you start importing clips. It also helps if know what song you want to work with, too.
Additionally, if your machine is rather slow, it could take a while to convert those clips to DV format. It usually takes me around 6~8 minutes to import a 2:21 DivX clip because it converts it as it imports it. The speed of import would depend on your processor, memory, and hard drive speed. Optimally, I generally have my iMovie project on an external Firewire hard drive while I import the AVI file that sits on the main hard drive. That way, one hard drive is busy reading data while the other is writing data. It's like redistributing bandwidth between Firewire and ATA drives ... or something ... too much technical stuff there.
So in a nutshell, if you are tight on disk space and/or have a slow machine, you might want to import only the clips you plan on using instead of everything.
![]()
The first thing I would import would be the song file. If it's in your iTunes library, you can easily access it using the Audio button on the graphical menu bar. Just simply Drag-n-Drop the song file from the Audio pane or a Finder window into the timeline and you got your song to work with. If the song is in an actual CD instead of a (legally?) downloaded file, then you can acquire the track straight from the CD through the Audio pane. After adding your song, you should then add some bookmarks (COMMAND+B) of where a possible transition or scene emphasis should take place. For example, you imported move's DOGFIGHT into your iMovie project. You could add bookmarks noting where the song picks up in the intro and those separating Yuri's verses and Motsu's raps and parts when Motsu yells "Dogfight!" Then you would make note that a short and flashy punch ("DOG-") or kick ("-FIGHT!") attack would appear when that happens.
... However, I didn't pick DOGFIGHT because that's already the opening them for Initial D 4th Stage ... meh!
That, and it wouldn't fit well enough with the anime I was using. Instead, I picked a song that I got from the iTunes Music Store a while back called Letter Read by Rachael Yamagata. I thought it sounded like an interesting song to use for Gunslinger Girl so I figured I put it to good use. It starts off haunting, then goes with somewhat heavy blues, and ends softly.

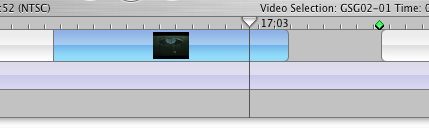
Above, you see the timeline. You see those green things? Those are bookmarks. I use those to figure how many frames I need in order to satisfy a certain portion of the song. They tell me when Rachael starts and stops singing and where certain interludes take place. Each bookmark is placed at a frame. In the example below, the marker is on the 46:13 mark which means the 13th frame (NOT millisecond!) after the 46th second mark. Each second consists of 30 frames (or 25 if you chose PAL in the Preferences) so when you insert your clips, you'd want to make sure you have the frame-space for that. A frame is the smallest unit next to a second so it might be easier to think in terms of frames instead of seconds if your scene consists of only a few seconds.
![]() After we place our bookmarks, it's time we start including some clips! Remember, you can't import anything larger than 9:57 minutes (or 9:27 on PAL) so make sure you split the movie into smaller segments using Explicit or MEncoder. Also remember that DV files are huge! You might want to take a look at your remaining hard drive space and your trash can contents as you work on your video. This is displayed at the bottom right of the iMovie window. This gets bigger as you apply graphical and text effects to your working clips as well as getting of unused clips from the Clips pane. If you want to Empty it, you can click on the Trash Can. Also take note that once you Empty the trash can, you will not be able to undo any Effects that you have applied to your movies.
After we place our bookmarks, it's time we start including some clips! Remember, you can't import anything larger than 9:57 minutes (or 9:27 on PAL) so make sure you split the movie into smaller segments using Explicit or MEncoder. Also remember that DV files are huge! You might want to take a look at your remaining hard drive space and your trash can contents as you work on your video. This is displayed at the bottom right of the iMovie window. This gets bigger as you apply graphical and text effects to your working clips as well as getting of unused clips from the Clips pane. If you want to Empty it, you can click on the Trash Can. Also take note that once you Empty the trash can, you will not be able to undo any Effects that you have applied to your movies.
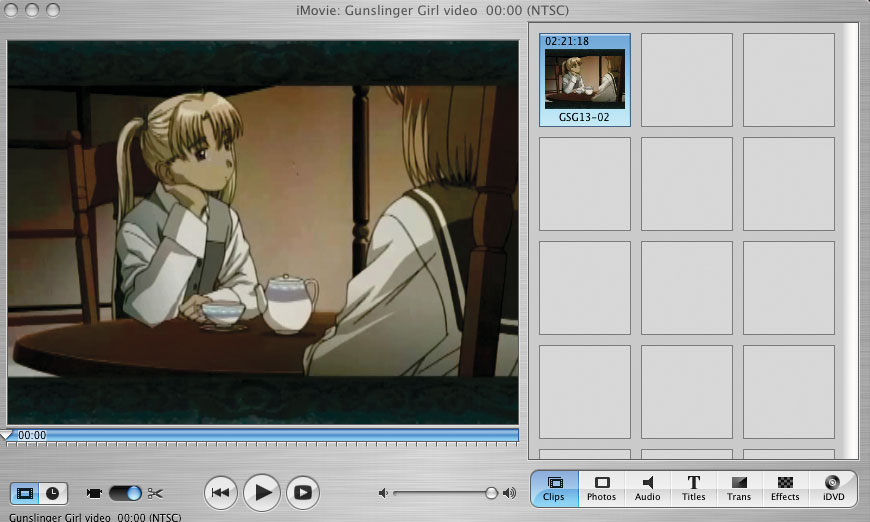
In order to import a clip, simple drag the .avi files (you can import more that one at a time) into one of the boxes in the Clips pane.
I guess while we wait for those clips to import, I'll show you a tip on splitting. I already told you that the smallest unit is a frame. Knowing this, you can use the arrow keys to go to the next or previous incremental frame. That's right! The arrow keys can help you get to a specific frame if you feel the need to do that. However, chances are that you probably split your video in larger chunks before you imported them. If you are one of those, you can actually split that one small clip into even smaller clips in iMovie! After you import your clip, seek to the Very First Frame of that scene and press COMMAND+T. Keep doing this for every scene that you feel you need to split at. Additionally, you'll want to know that splitted clips from Explicit usually has 18 white frames in the end of them. You can use this technique to remove those extra frames in the end before working with them in the timeline.
I already split my clip. [mouse over image to see it] How did yours turn out?
After we got our clips imported and butchered, let's move them in place. Using your mouse, drag-n-drop the clip from the Clip pane into your timeline. You can then shift the clips around by dragging them across.
Additionally, if you feel you can compromise a few frames in the middle just so a certain scene can fit, you can chop little bits of the middle off by seeking to the first frame, press COMMAND+T, then seek to the frame after the last frame of the scene you want to delete, press COMMAND+T again, and then select that part and press Delete.

You can also resize the clip by placing your cursor at the end or beginning of the clip until it changes into an arrow and then drag it from left to right.

Once you get your clips ready and in place, you can start playing around with Effects and Transitions. However, I wouldn't try to use too many different effects or transitions. Use Effects with discretion and try to limit yourself to one or two transitions or use certain transitions that would work well with the kind of audio you're using (for example, use a Smash-like transition when the audio hits a hard crash cymbal, gong, or glass breakage). Also note that some transitions add or remove time from the whole movie so you may want to make sure your audio and video are still in sync after you applied your transitions.

To give you a heads up what those little icons mean on the top of your clips, they tell you what you have applied. On the clip called "Music Video," a Text effect has been applied, signified by the little T icon on top of it. It's basically that little block of text that you would normally see in the beginning of a music video on MTV (do they even show music videos now?). The checkered box on the following clip called "GSG02-01" means that you have applied ordinary effect from a list of filters in the Effects pane. The little blue boxes signify a transition between the two clips.
 There are three kinds of transitions: openings, closings, and combiners. Each of them have one of the three icons next to it. On the image on the right, you see that Cross Dissolve is a combiner transition because it effects the two clips that it was placed between. These kind of transitions have an X-like icon next to it. The Fade In transition is an opening transition and affects the beginning of a clip that it was placed on. These transitions have a FastForward-like icon beside it. The Fade Out transition is a closing transition and has a Rewind-like icon next to it and affects the ending of a clip.
The nice thing about the transitions is that they also re-render themselves if you eventually want to apply an Effect on that transition so you don't have to delete the transition before adding any new effects.
Once you're done with your work of art, click here and I'll tell you some ways how to get your video exported.