
by Dennis 'Kirin' Ramos
kirin at saphiria dot net
Introductions | Splitting Clips
Import Clips and Using iMovie
Exporting from iMovie
Helpful Tips and Suggestions
In this page, you can pretty much export it in whatever format you want. I'll provide three formats: DivX, XviD, and QuickTime Sorensen. I'll leave it up to you to figure out which codec is best for you.
Method 1: DV Export and Conversion to DivX
When you're done, you're ready to get it converted to DivX. File --> Share ... From there, you should see a sheet that looks like this:
Click on the QuickTime logo and in the "Compress movie for:" pulldown menu, choose Full Quality DV and then click the Share button. My movie, which is almost four minutes long (which includes the intro in the beginning of the movie) may be as large as 835 MB. The export process took around 6 minutes on my computer.
How about exporting to a QuickTime .mov instead? Of course, you can probably use QuickTime since it's used by the lots of viewers on the Internet, like Windows Media and Real Media (aka "The Big 3"), but for some reason or another, the Anime community seems to prefer DivX, XviD, or 3ivx. That, and most fansubs are usually compressed in one of those three formats. It's like a 'standard' or something. But if you insist in using QuickTime, scroll down pass the DV-to-DivX conversion process and we'll talk about QuickTime export. Of course, you can probably use QuickTime since it's used by the lots of viewers on the Internet, like Windows Media and Real Media (aka "The Big 3"), but for some reason or another, the Anime community seems to prefer DivX, XviD, or 3ivx. That, and most fansubs are usually compressed in one of those three formats. It's like a 'standard' or something. But if you insist in using QuickTime, scroll down pass the DV-to-DivX conversion process and we'll talk about QuickTime export. |
Once we have our DV file exported, it needs to be converted over. This is where D-Volution comes in. The process is very simple.

This is what D-Volution looks like. If you don't see that drawer on the left side, click on the green arrow button on the bottom left of the window to view it.
To convert it, simply Drag-n-Drop the .dv file into the black area where it says "no film." You can probably press that Green button right about now but I wouldn't just yet. To me, I think 640 x 480 for a music video is a bit of an overkill. Now, it might be okay if you use fansubs that are much larger, like 720 x 480 (standard DV-NTSC format), or DVD-rips at their original resolution but if you use a fansub that's is or much lower than 640x480, it might not look good as you might be re-introducing some artifacts that were present in the original fansub. However, if your footage is not 4:3, you may want to set your sizes accordingly. You can view the small table as a guide for resolution sizes.
Ratio Reference Sheet |
||
4:3 |
3:2 |
16:9 |
320x240 |
512x336 |
512x288 |
512x384 |
640x432 |
640x352 |
640x480 |
720x480 |
720x400 |
I've always used 512 x 384 so that the resizing would dilute some of those artifacts. It's like between 640x480 and 320x240. Additionally, I would enable '2-Pass encoding' and check 'disable preview.' 2-Pass encoding supposedly makes the video look better (but takes a little longer to encode) and disabling the preview will allow the video to encode faster. For bitrate, I use 1152 because 1152 + 128 = 1280. Theoretically, the music video should be 10x the size of a MP3 or AAC encoded at 128 kbps. Of course, the video bitrate is VBR so the actual average bitrate may vary but it's usually lower than the number that was entered. For the encoding time, it usually takes between 25~30 minutes for a 3:52 minute video. Time varies depending on the speed of your processor and hard drive and the amount of memory installed.
You now have a DivX file which is pretty much suitable for your general Anime viewer out there. Upload it on your website. Share it on BitTorrent. Submit it to AnimeMusicVideos.org ... whatever! As long someone sees all that hard work you've done!
Method 2: QuickTime Export and Conversion to XviD
In this part, I'll use ffmpegX to convert an exported QuickTime file with a DV stream into XviD.
NOTE: Exporting as "Full Quality DV" doesn't work! The DV stream needs to be in a QuickTime container format for ffmpeg or mencoder to work properly with it. (If you try it, you'll get some weird colourspace error in ffmpeg and 'Encrypted VOB' error in mencoder)
Now, let me tell this: ffmpegX is a front-end to both MEncoder and ffmpeg command-line programs, hence the name. So if you know how to get really dirty with MEncoder and ffmpeg, you probably don't need to use ffmpegX but since it is more convenient to use a GUI instead of a command-line, we'll use ffmpegX in this tutorial. Additionally, the settings I use in ffmpegX increases the encoding time substantially because I'm more of a quality-type of person. I'm the kind of guy that would work overtime in a QA department for a large corporation making sure that everything looks good before version 1.0 hits the streets.
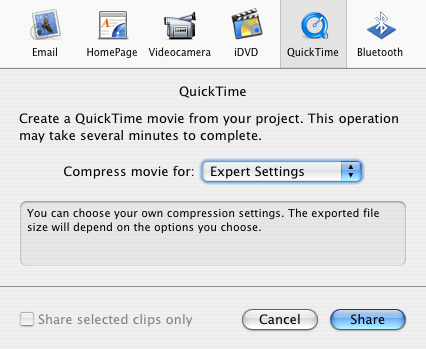
Before we use ffmpegX, we need to export the file as QuickTime format. Go to File --> Share ..., click on the QuickTime tab, and choose Expert Settings in the "Compress movie for:" pull down menu.
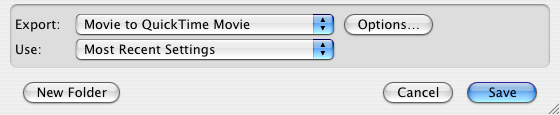
In the Save As screen, choose "Movie to QuickTime Movie" and click on the Options button.
Now that you are at the Movie Settings window, let's make sure you got the same as mine.

For the video, I use DV/DVCPRO - NTSC (or DVCPRO - PAL if you worked in PAL mode in iMovie) for video since iMovie is a DV-based editor and you would not lose any quality when using a DV file. For sound, I use an Uncompressed audio since ffmpegX will do the compression to MP3 using LAME. You might want to uncheck "Prepare for Internet Streaming" since you're not uploading this file on the Internet. When the export is done, which took around 5 minutes, I get a 835 MB file. Note that the filesize is normal. We want it that big, but don't worry. When it gets compressed to XviD, it's going to be 20x smaller when we're done.
Now, when you use ffmpeg for the first time, you should get a screen asking you to install some binary files. Because of some licensing deal, you have to download those three binaries separately. Just go to the web addresses provided to download them, extract them anywhere on your hard drive and let ffmpegX install them where the program wants to look for them. Since version 0.0.9m these files are dumped in the /Library/Application Support/ffmpegX directory. This is a good thing, especially if we compiled our own copies of mplayer and mencoder and don't want ffmpegX's version to interfere with it.

If you don't want to see that annoying intaller message, download those three files (you can copy-n-paste the URLs in that installer window into the address bar of your browser) and let ffmpegX's installer copy those binaries to its desired location. Also note that your admin password is required for these binaries to be installed. (If you use 'sudo' a lot in the Terminal, it's that same password you put in that text box.)
NOTE: If you have PeerGuardian installed, you will need to flush your ipfw entries first before download the Real-libs. For reasons that I could never figure out, PG blocks anything involved with RealPlayer. You can do this by going to the Terminal and typing sudo ipfw flush before attempting to download them.
 |
||||||
Click on the tabs to see the settings I use for each section. If you read the previous section on encoding to DivX, you'll note that I use 1152 kbit/s and 512x384 pixels. I use the same thing here on the Video settings (although, I would use different video sizes depending on the source). Also make sure your framerate is set on NTSC (29.97) or PAL (25) depending on the settings you used in iMovie. You could also use 23.38 fps, but if you applied certain motion effects, the slower framerate may effect your output video drastically if using NTSC. If your video source is something different from 4:3, you may want to set the video size accordingly. Below is a reference of different resolutions among video ratios.
Ratio Reference Sheet |
||
4:3 |
3:2 |
16:9 |
320x240 |
512x336 |
512x288 |
512x384 |
640x432 |
640x352 |
640x480 |
720x480 |
720x400 |
For the Audio settings, I left everything as is except for the Mode, which I changed from CBR to VBR since in theory, it's supposed to have a good trade-off between quality and size. I usually use VBR setting if I'm using a song straight from the CD or from the iTMS. Otherwise, I use ABR (which is VBR but a bit more constraining).
In the Filter settings, I would enable Dering and Deblock. This is to minimize the number of artifacts during the encoding process. If using a DVD source, I would also check the Deinterlace and Denoise boxes as well.
The Options had the most changes. I enabled all the options in the left except for Interlaced content. I also changed the Scaling method to bicubic spline since it matched a similar option in Photoshop CS in terms of resizing images. Although, since this Anime instead of live action stuff, the scaling methods wouldn't make much difference so I should have sticked with fast bilinear. For the QMin and QMax, I left those blank as I have found those to affect quality in some odd cases. If there is a number there, remove it.
For Tools, I enabled the Open Terminal Window option because I like to see what's going as the file is being encoded. If I left that unchecked, for some odd reason, I wouldn't see the progress going, even when clicked on the Info button but that part is optional.
After all this, it took around a good two hours to encode. Between the time I started and the time it ended, I cooked a low-carb meal and took a nap. It eventually finished.
Now you have an AVI file encoded using XviD 1.0.1. You can now share with everyone else on the net. Have fun!
Method 3: QuickTime Sorensen Export
Like almost every single movie trailer out there, it will be available in QuickTime and one of the other two formats if not both Windows Media and Real Media. In this section, I'll tell what settings I use to export to QuickTime.
The first thing you would do is go to File --> Share ...
Click on Share and then you'll see something like this:

Then click on Options...
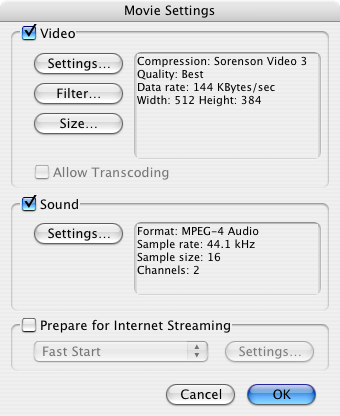
From there, you can configure which audio and video codec to use for your QuickTime video. Apparently, the movie industry prefers Sorensen Video 3 for video and Apple prefers MPEG-4 Audio for the Audio format. So I have my settings configured for that. You can change the audio and video codec you want to use by clicking on "Settings..." for each section respectively. Also remember that the bitrate for the video settings is measured in kBytes per second instead of kBits per second so if you normally use 1152 kbps in DivX, you would use 144 kbytes since eight bits equals one byte. I also included a Sharpen filter but that's optional; It's just something that I always do when I export to QuickTime. In addition to that, I also resized it to 512x384 since iMovie has a habit of exporting it at 720x480 regardless of the source footage. Depending on the video ratio of your footage you might want to resize accordingly. Please look at the table below for an idea what resolutions to use:
Ratio Reference Sheet |
||
4:3 |
3:2 |
16:9 |
320x240 |
512x336 |
512x288 |
512x384 |
640x432 |
640x352 |
640x480 |
720x480 |
720x400 |

Additionally, you might want to check your Audio Options by clicking on the Options button in the Audio Settings window. You should get a window like that one above. Make sure your bitrate is at 128 and using Low Complexity AAC.
After that, encoding to Sorensen Quicktime took around 35 minutes for a 3:52 minute clip. Kind of wished I owned a Dual-Processor G5 for this.
Which codec should I use? However, if I'm encoding videos for a corporate business, I'd use QuickTime since it's more widely accepted than DivX or XviD. Additionally, QuickTime is much friendlier on both Macs and PCs. That, and it seems to be a favourable format by the movie industry for some reason or another. I theorize that it might be Steve Jobs' connection with Pixar. If you have yourself a copy of Discreet's Cleaner or Apple's Compressor (usually comes with Final Cut Pro), then you can export the file as a full quality DV file and run it through those programs to create a better-quality QuickTime file than using those built-in options. |
You're pretty much done but if you want to know some other useful things ... click here.